
Kitty Cake Pops Recipe
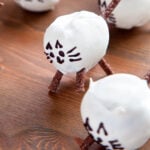
Kitty cake pops with leg and tails for even more cuteness and an extra crunch.
Servings: 20 cake pops
Ingredients
For the sponge
- 150 g slightly salted butter or margarine, softened
- 200 g white caster sugar (superfine sugar)
- 3 medium free range eggs medium free range
- 1 tsp vanilla extract
- 200 g self-raising white flour (self rising flour)
- 1 tsp baking powder
- 2 tbsp cocoa powder (dutch processed)
To create the pops
- 8 tbsp chocolate frosting (we used store-bought Chocolate Fudge Icing)
- 20 cake pop sticks
- 30 g milk chocolate melted, for securing the sticks
To decorate
- 350 g white candy melts or white chocolate, melted
- 100 g chocolate peppermint sticks straight pretzels will also work
Instructions
To make the sponge
- Preheat the oven to 170C/240F (150C/300F fan). Add the butter, sugar, eggs and vanilla essence to a bowl and beat. Fold in the flour, baking powder and cocoa.
- Spread evenly in a cake tin and bake for around 25 minutes until springy on top. You can use one cake tin, but spreading the mixture out over two will make it cook and cool more quickly. If you're in a hurry you can also buy a pre-made chocolate sponge.
- Wait for the cakes to completely cool.
To turn in pops
- Cut the cake into large chunks and place in a large bowl. Crumble the cake with your hands gently until it resembles coarse bread crumbs, then use your hands to work in the frosting, adding spoonful by spoonful until it just starts to come together as a crumbly but mouldable mixture.
- If you have an ice scream scoop handy it's a great way of making sure all the balls will be of an even size, if not you can just do it by eye.
- Roll your portions into balls. Try to get them as round as possible but don’t squash them too much – you don’t want them to be too dense.
- Dip each cake pop stick into melted chocolate to about 1/2cm.
- Push each stick half way into a cake ball. Repeat until you’ve pushed all the sticks in to an equal depth.
- Put them all in the fridge to chill for 2 hours.
To decorate
- Make sure everything is ready before you take the cake pops out of the fridge so that they stay as cold as possible.
- Dip each cake in turn into the candy melts to cover the whole pop, then twist a few times over the tub to get rid of the drips.
- Before it dries, carefully push in the chocolate peppermint sticks into the cake pops to form the legs and tail.
- Push the cake pop stick into a piece of polystyrene or box lid so that the pops stand up while they set.
- Once the cake pops are fully set you can remove the sticks and add the face details using an icing pen.
Video
Nutrition
Calories: 243kcal | Carbohydrates: 32g | Protein: 2g | Fat: 12g | Saturated Fat: 7g | Cholesterol: 40mg | Sodium: 88mg | Potassium: 74mg | Sugar: 23g | Vitamin A: 225IU | Calcium: 19mg | Iron: 0.5mg
Tried this recipe?Snap a pic and tag @amummytoo on Instagram or tag @EmilyLearyCooks on Twitter. I can't wait to see your posts!