
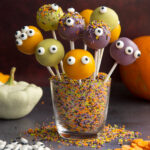
Halloween Cake Pops Recipe
These spookily cute Halloween cake pops are so fun and so easy to make! Best of all, there's no need to bake with this recipe as it all starts with a store bought chocolate cake.
Servings: 14 cake pops
Equipment
- Cake pop sticks
- Cake pop stand
- 4 Small heatproof bowl
Ingredients
- 400 g chocolate fudge cake with frosting approximate weight
- 25 g milk chocolate melted (for securing the sticks)
- 150 g orange candy melts
- 150 g purple candy melts
- 150 g green candy melts
- 2 tbsp sprinkles
- 2 tbsp candy eyes
Instructions
Make the cake pops
- Get the melted chocolate ready in a little bowl.
- Drop the chocolate cake into a bowl. Cut up into rough pieces with a cutlery knife.
- Use your hands to squeeze together into a smooth, slightly sticky dough.
- Divide your cake mixture into 13-14 equally sized balls - you can get them really evenly sized by weighing out the mix and then weighing each ball, if you like. Mine were 30g each, which is a good size to work with. Try to get them as round as you possibly can by cupping your palms and rolling the mixture between them. Place them on a tray as you go.
- Dip the very end of a cake pop stick into the melted chocolate, then push it into a cake ball about half way. The chocolate helps to hold the stick in the cake.
- Put all of the cake pops onto a tray lined with baking paper and pop into the refrigerator for 1-2 hours to get cold and firm up. If you like, you can leave them overnight and finish making your cake pops in the morning.
Decorate the cake pops
- You will need something to stand your cake pops in as you work. I used a cake pop stand, but an upturned colander or piece of polystyrene will also work.
- Melt your candy melts according to the packet directions.
- Take each cake pop in turn and dip them into the candy melts, gently coating on all sides. This can take a bit of practice to get right. Allow the pops to drip over the bowl - this will help avoid excess melts from dripping down the stick. If your melts seem too thick, you stir in a couple of drops of vegetable oil.
- Add some sprinkles to some of the cake pops straight away, before the candy shell sets. Stand your cupcakes up and leave to set completely.
- Once set, you can stick on the candy eyes in any patterns you like using a few dots of candy melt.
Video
Notes
You won't use all of the candy melts, but you need to melt enough to give enough depth to dip the cake pops into. When you've finished, you can spread the leftover melts on a clean sheet of greaseproof paper (one sheet per colour) and spread thinly with your spatula. Once set, simply break up into pieces, ready to use for a future bake.
Nutrition
Calories: 167kcal | Carbohydrates: 26g | Protein: 2g | Fat: 7g | Saturated Fat: 3g | Polyunsaturated Fat: 1g | Monounsaturated Fat: 2g | Sodium: 243mg | Potassium: 99mg | Fiber: 1g | Sugar: 16g | Vitamin A: 1IU | Calcium: 43mg | Iron: 1mg
Tried this recipe?Snap a pic and tag @amummytoo on Instagram or tag @EmilyLearyCooks on Twitter. I can't wait to see your posts!