
How to Put Pastry in A Pie Tin
A perfect pie, quiche or tart starts with a perfect pastry case. Here's how to put pastry in a pie tin so that it turns out beautifully.
Servings: 1 pie crust
Equipment
Ingredients
- 200 g plain white flour (all purpose flour)
- 100 g slightly salted butter cold and cubed
- 2 tbsp water
Instructions
Make your pastry
- A good pastry case starts with a good, reliable shortcrust pastry that rolls out well and doesn't tear when lining your tin. If you're following a different recipe, you can skip this section.
- Make sure the butter is nice and cold. Cut it into small cubes and place in a bowl with the flour.
- Rub together quickly and efficiently, letting it fall through your fingers back into the bowl until you have something resembling fine breadcrumbs.
- You can do this by pulsing in a food processor, if you prefer - this is a particularly good idea if you have very hot hands as they can melt the butter and make the pastry greasy.
- If you shake the bowl, it should bring any remaining lumps of butter to the top for you to rub in.
- Add the 2 tbsp of ice cold water - it needs be cold to keep the butter cold and prevent the pastry from becoming greasy.
- Cut the liquid through the crumb with a cutlery knife until it starts to stick together in clumps with no dry flour at the bottom.
- If it still seems really dry, add another drop or two of water but try not to add more as a wet dough may result in a tough pastry or a soggy bottom.
- Shape the pastry quickly into a ball. You don't need to knead it like you would bread as that would make it tough, but you will probably need to fold it over a few times to get an even texture with no dry patches or wet streaks.
- Flatten the pastry into a thick disc to make it easier to roll out later, wrap and pop in the fridge for at least 10 minutes to firm up.
Rolling your pastry out
- Lightly flour your surface - if you put loads of flour down, it will dry out your pastry and make it harder to roll.
- Flour your rolling pin, too, to stop it from sticking.
- A common problem when rolling out pastry is that the edges crack and these cracks are only amplified as the pastry is rolled larger.
- To avoid this, you can press gently down on your pastry all the way across - pressing not rolling - then turn the pastry 90 degrees and repeat until the pastry is quite large and thin. This method is called ridging and can really help keep your pastry cohesive and even.
- You can then switch to a standard rolling action, continuing to rotate the pastry now and then and adding a touch more flour to your surface where necessary to avoid sticking.
- Your pastry is ready to use when the pastry is 3-5cm (1-2 inches) wider than your tin.
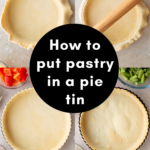
Line your pastry case
- Loosely roll your pastry around the rolling pin and then lift it unroll into the tin.
- Pull the sides of the pastry inwards and tuck the corners right in, working all the way around so that there are no air bubbles.
- Now, with the excess hanging over the edges of the tin, roll your rolling pin over the top of the tin to neatly trim off the excess.
- If your tin has a lip or a more blunt edge, this method won't work, so instead cut all the way around with a sharp knife.
- You have now lined your pastry case!
Blind bake your pastry case
- Some recipes mean you can add the filling straight to the raw pastry case and bake, but sometimes, a recipe will ask you to 'blind bake' the pastry case.
- All this means is that you need to part cook the pastry case before you add your fillings.
- It's not too tricky to do, but many recipes don't include detailed instructions, so the following steps work for a 23cm (9 inch) pie tin.
- Step one is to scrunch up some baking paper and use it to closely line the inside of the pastry case. Really tuck the paper into the inside corners so that it can support the pastry well.
- Now, fill the paper with baking beans making sure to work them into the corners. Some baking beans are really quite big, so I like to use some smaller dried beans or pulses to fill in the smaller spaces and ensure I get into the corners.
- Make sure the beans fully support the sides of the pastry but leave a shallower dip in the middle.
- Place the tin in the oven and bake for 15 minutes. Lift out the baking paper with the beans (careful, they’ll be very hot) and have a look at your pastry. It should look dry at the sides but will probably still be a bit doughy on the base.
- Return to the oven for a further 5 minutes until it looks dry all the way across. If there are any air bubbles on the base, you can gently smooth them down with the back of a spoon.
Nutrition
Calories: 1445kcal | Carbohydrates: 153g | Protein: 22g | Fat: 83g | Saturated Fat: 52g | Polyunsaturated Fat: 4g | Monounsaturated Fat: 21g | Trans Fat: 3g | Cholesterol: 215mg | Sodium: 649mg | Potassium: 238mg | Fiber: 5g | Sugar: 1g | Vitamin A: 2499IU | Calcium: 55mg | Iron: 9mg
Tried this recipe?Snap a pic and tag @amummytoo on Instagram or tag @EmilyLearyCooks on Twitter. I can't wait to see your posts!