
Wicked Defying Gravity Cake Recipe
Try this incredible, gravity defying chocolate and vanilla cake, inspired by the blockbuster musical, Wicked.
Servings: 12 slices
Equipment
- Dowel or skewer
- Straw with an angled top
- Glue or tape
- Green card
- Craft knife
- 2 Round 18 cm (7") nonstick cake tin
Ingredients
For The Sponge
- 150 g white caster sugar (superfine sugar) superfine sugar
- 2 medium free range eggs beaten
- 150 ml vegetable oil canola oil
- 150 ml whole milk
- 2 tbsp golden syrup
- 1 tsp black gel food colouring
- 175 g self-raising white flour (self rising flour) self rising flour
- 2 tbsp cocoa powder dutch processed
- 1 tsp bicarbonate of soda baking soda
For The White Chocolate Buttercream
- 275 g slightly salted butter softened
- 550 g icing sugar (powdered sugar) powdered sugar
- 1 tbsp whole milk
- 1 tsp vanilla extract
- 1 tsp green gel food colouring
- 150 g white chocolate
To decorate
- 300 g green chocolate beans I used smarties, m&ms and giant skittles to give a slight variation in colour
- 100 g milk chocolate
Instructions
Make the Sponges
- Pre-heat oven to 180ºC (160C fan assisted / 360F).
- Grease and line two 20cm loose-bottomed cake tins.
- Put the sugar, beaten eggs, oil, milk and golden syrup in a large bowl. Whisk together.
- Sift in the flour, cocoa and bicarbonate of soda. Whisk to combine.
- Share the mixture between the two lined cake tins.
- Bake for approximately 30 minutes until firm and springy on top.
- Cool in the tin for 10 minutes, then remove from the tin and place on a cooling rack to cool completely.
Make The Green Chocolate Buttercream
- Melt the white chocolate and set aside to cool. If it’s added to the frosting warm, it will melt the butter.
- Put the butter in a large bowl. Whisk until pale and creamy.
- Sift in the icing sugar, then add the milk and vanilla. Beat until very pale and fluffy.
- Add the cooled melted white chocolate to the frosting and whisk to combine.
- Stir in the green food colouring. You may need to add more green colouring as necessary to get the shade you want.
- Transfer the frosting to a piping bag fitted with an open star nozzle.
Assemble the cake
- Place one cake on a board.
- Pipe tall rosettes on top of the cake, using about half the frosting.
- Place the second cake on top.
- Pipe tall rosettes of frosting again. You might not use all the frosting.
- Frost 1 quarter side of the cake with a thin layer of frosting (you'll stick your chocolates to this later).
- Place the cake in the fridge for at least an hour to firm up.
Decorate the cake
- Melt the chocolate in a small bowl leave to cool. It needs to be close to setting point to successfully work as 'glue' for your chocolates.
- Push a dowel into the centre of the cake, then slide the straw over it.
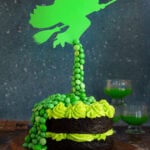
- Arrange some chocolate beans on top of the cake, radiating from the central straw towards and down over the iced side of your cake.
- To fix the beans to the straw, work from the bottom to the top. Dab them with a little chocolate and then press onto the straw. Stop when you reach the bend in the straw.
- Print your witch template and fix to the top of the straw with glue or tape so that Elphaba appears to be leaving a stream of chocolate in her wake.
- Leave your cake to set and once you've all finished admiring it, it's time to slice and serve.
Nutrition
Calories: 772kcal | Carbohydrates: 97g | Protein: 5g | Fat: 42g | Saturated Fat: 21g | Polyunsaturated Fat: 8g | Monounsaturated Fat: 10g | Trans Fat: 1g | Cholesterol: 83mg | Sodium: 280mg | Potassium: 127mg | Fiber: 2g | Sugar: 83g | Vitamin A: 676IU | Vitamin C: 1mg | Calcium: 77mg | Iron: 1mg
Tried this recipe?Snap a pic and tag @amummytoo on Instagram or tag @EmilyLearyCooks on Twitter. I can't wait to see your posts!