
How to Make Dinosaur Cookies Recipe
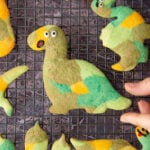
They're cute, they're multi-coloured, they're technically extinct! Here's how to make crisp, sweet dinosaur cookies you'll love every bite of.
Servings: 24 cookies
Equipment
- Dinosaur cookie cutters
Ingredients
- 110 g margarine
- 100 g white caster sugar (superfine sugar)
- 1 medium free range eggs
- ½ tsp vanilla extract
- 250 g plain white flour (all purpose flour) plus extra for dusting
- ¼ tsp bicarbonate of soda (baking soda)
- ¼ tsp baking powder
- ¼ tsp salt leave out if using salted butter
- writing icing pens black, white and red
- food colouring green, blue, red and yellow
Instructions
- Preheat the oven to 200C (180C fan assisted, 400F).
- Put the butter and sugar in a bowl. Whisk together until fluffy.
- Add the egg and vanilla. Whisk together.
- Add the flour, baking powder, bicarbonate of soda and salt (if using). Mix until evenly combined and starting to clump.
- Turn out onto an un-floured board and knead only as much as it takes to get a smooth ball of dough.
- Divide the dough into four and roll each into flattened discs.
- Add food colouring to each to give different shades I used the following for each ball of dough: 1) yellow 2) green 3) green and blue 4) green and red.
- Knead each ball, folding until the colour is distributed - it's fine if it's a little streaky as this will add to the effect.
- If the dough balls feels too soft (this can happen if your kitchen is warm) then wrap and pop them the fridge to rest and cool for 15 minutes.
- Flour your surface lightly, then start to tear small pieces of dough off each colour and dot them around to create a sort of camouflage pattern. Gather the dough together into a slab.
- Roll out to approximately 7-8mm thick (approx 1/3 inch).
- Cut out the dinosaur shapes. Aim to cut them close together to reduce the need to reroll too many times.
- Gather the offcuts and, just as you did before, gather into a slab, which you can then re-roll to cut further dinosaur shapes.
- Place the cookies on baking sheets lined with greaseproof paper. They don't spread much at all, so can be place quite close together.
- Bake the cookies for 8 minutes.
- Transfer to a wire rack to cool completely.
- To finish, use your writing pens to add eye and mouth details to your dinosaurs. You can make them as cute or as scary as you wish!
Video
Notes
Place any leftover biscuits in an airtight container and store in a cool place. They should keep for 3-5 days.
Nutrition
Calories: 90kcal | Carbohydrates: 12g | Protein: 1g | Fat: 4g | Saturated Fat: 1g | Trans Fat: 1g | Cholesterol: 7mg | Sodium: 82mg | Potassium: 20mg | Fiber: 1g | Sugar: 4g | Vitamin A: 174IU | Vitamin C: 1mg | Calcium: 6mg | Iron: 1mg
Tried this recipe?Snap a pic and tag @amummytoo on Instagram or tag @EmilyLearyCooks on Twitter. I can't wait to see your posts!