
This is the story of how I came to want and need braces to correct crowded teeth, how I came to settle on lingual or hidden braces, and
Steadily crowding teeth
I have wanted braces for more than 20 years. That sounds crazy when I hear myself say it, but it’s true! Ever since my mid-teens, my teeth have been an increasingly crowded problem that I never got round to solving.
First, it was put off for health reasons. I got
Next, I went off to uni and then on to work so that by my 20s, I felt too old (ha!) for big, shiny, visible braces. And I didn’t have the funds anyway, so orthodontic work of any kind simply wasn’t an option.
While I was pregnant with JD in my early-20s, my teeth really started to move. I started to become conscious in particular of one front tooth that sat further forward and made the incisor next to it look absent in certain lights. I started to become super self-conscious about my smile.
Between then and late 2018, my teeth shifted f
Luckily, during those years, my teeth may have crowded further, but my self-confidence has grown with age, and I no longer worry much about what other people think.
I learned with time that I feel good when I smile, and that is enough reason to go ahead and cook, chat and present with a big, wide smile. Happiness is more important than straight teeth.
But in the back on my mind, I still dreamed of a Hollywood smile - beautifully straight teeth and a wide, healthy grin. Teeth that drew my attention when watching clips back not because the lighting made me look like I had an incisor missing but because they were beautiful. Some months I didn’t care, other months I’d research braces most days.
After lots of reading, I discovered two options that I believed might work for me. The first was tooth-coloured braces, similar to classic train tracks but with clear or tooth-coloured fittings that blend with the teeth and can hardly be seen unless you’re close up.
Now, I know from having seen them close up that tooth-coloured braces are GREAT. My friend Claire had them and they were really not very noticeable and the result she got at the end was gorgeous.
But because my work involves quite a few video
An obsession with lingual braces
Lingual braces are pretty similar to train tracks, except they’re attached to the back of each tooth, meaning that from the outside, they can’t be seen. What a genius idea! From the moment I learned of their existence, I wanted them
The main pros in comparison to standard braces are:
- They’re hidden, so no one can see them.
- If food gets stuck in them, no one can see it.
- As they’re fixed to your teeth, you can’t forget to wear them.
And the main downsides are:
- Like all fixed braces, they need lots of care, ideally brushing in full after every meal and using special brushes to clean between the wires.
- Unlike braces fitted to the outer tooth surface, lingual braces have to be custom-made to fit the unique shape of your inner bite, which means the cost is higher.
- The metal is on the same side as your tongue and so there can be some issues with eating and speech while you adjust.
That last point about interference with speech was my single biggest concern. I knew that I would be able to handle the brushing, discomfort and so on but as a presenter, if my speech was significantly compromised, I’d be in trouble.
So this was the part I researched the most. I watch YouTube videos of people before and after having lingual braces fitted. I listened for lisps and slurs. I watched a whole series made by a singing teacher and carefully studied her progress. She started the process in quite a lot of pain, but soon her speech was perfect, and that really encouraged me. I felt like it was something I could handle.
A serendipitous email
I had my sights set of lingual braces and started saving up for them. Then, in late 2018, after a family adventure in Edgbaston, Birmingham I got an email from orthodontic treatment clinic Signature Orthodontics.
The email said that Signature Orthodontics would like to work with me to give me the smile I’d always wanted. It was total serendipidy! Right away, I fired an email back saying it sounded great and that I already knew what I wanted!
Starting the orthodontic process
Obviously, you don’t just walk into a dentist and they whack braces on you there and then. There’s quite a bit of consultation and planning that comes first. Here’s how it worked for me.
A first consultation
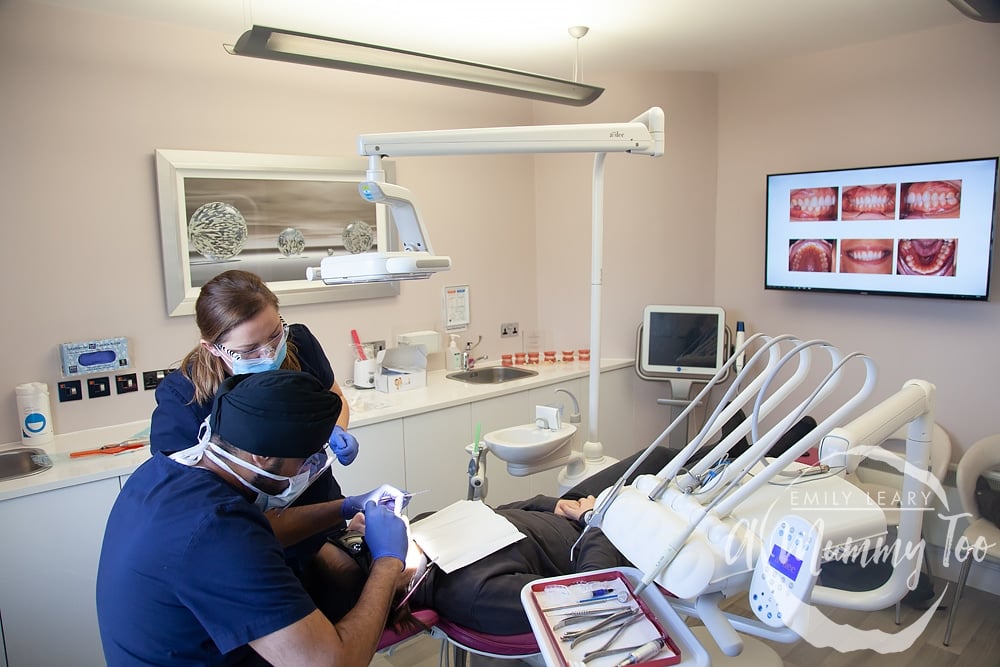
On my first appointment, I met the team: Practice Manager Suky Bhogal, Orthodontic Therapist Dominika Pawlikowska and lead orthodontist Dr Preet Bhogal.
Dr Bhogal took a really good look at my teeth, took photos and talked me through the options that would be available to me.
We discussed Invisalign, tooth-coloured braces and lingual braces and I asked lots of questions. Dr Bhogal and his team were amazing, patient and full of information to tick off every concern I had.
A treatment plan and options
Soon after, a full treatment plan with options arrived in the post, and I had a really good read through. Over the next few days, I talked it over with Mark in great detail and it was really evident that I still had my heart set on full top and bottom lingual braces.
I resolved to go for it. I was still worried about my speech, but I promised myself I would work really hard to get my speech back to normal as quickly as possible.
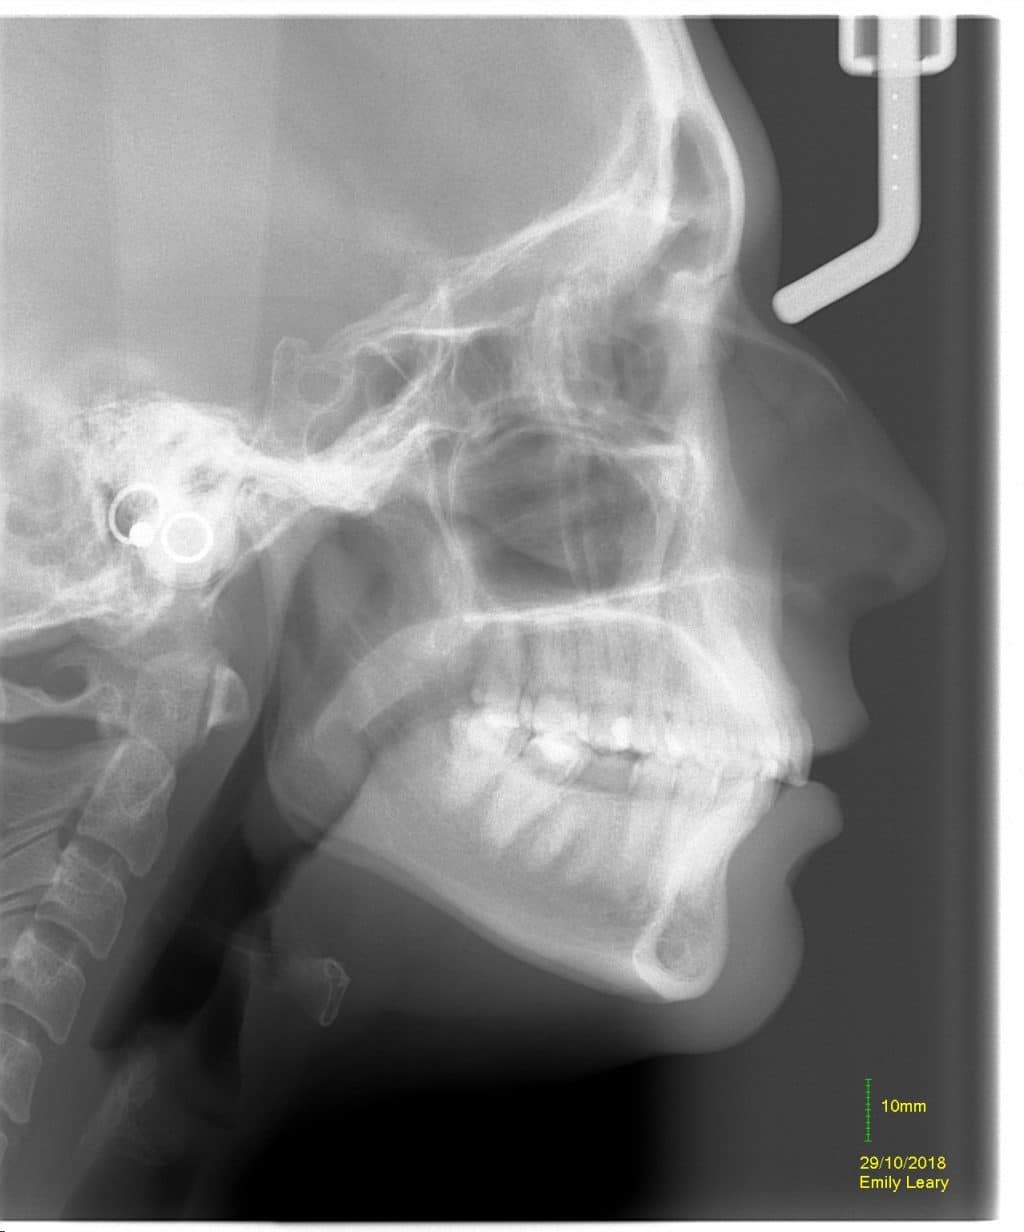
Scans and x-rays
At the next appointment, I headed to a clinic over the road to have both a front on and side X-ray of my bite. This was easy and totally painless.
On the same day, I headed over to the Signature Orthodontics team, who carried out a scan of my teeth. They ran a pen around every surface of my teeth from front to back, top to bottom and as if my magic, a 3D model of my bite appeared on
With Dr Bhogal happy that I was suited to whichever form of orthodontics I wanted, I went through and had a good chat with Suky, and learned that since the lower braces tended to be the ones that caused more tongue irritation, and since I don’t really show my bottom teeth much when I smile, I could even consider the option of lingual braces on the top arch, and tooth-coloured braces on the bottom set. Having had them herself, Suky was able to give me a really good picture of what the experience with the braces was likely to be, and I was really grateful for her honesty. I had a lot to think about!
Consent and a glimpse at my future
In a final appointment before the fitting, Dr Bhogal showed me a computer simulation of what my teeth would look like at the end of treatment and I was more motivated than ever. They
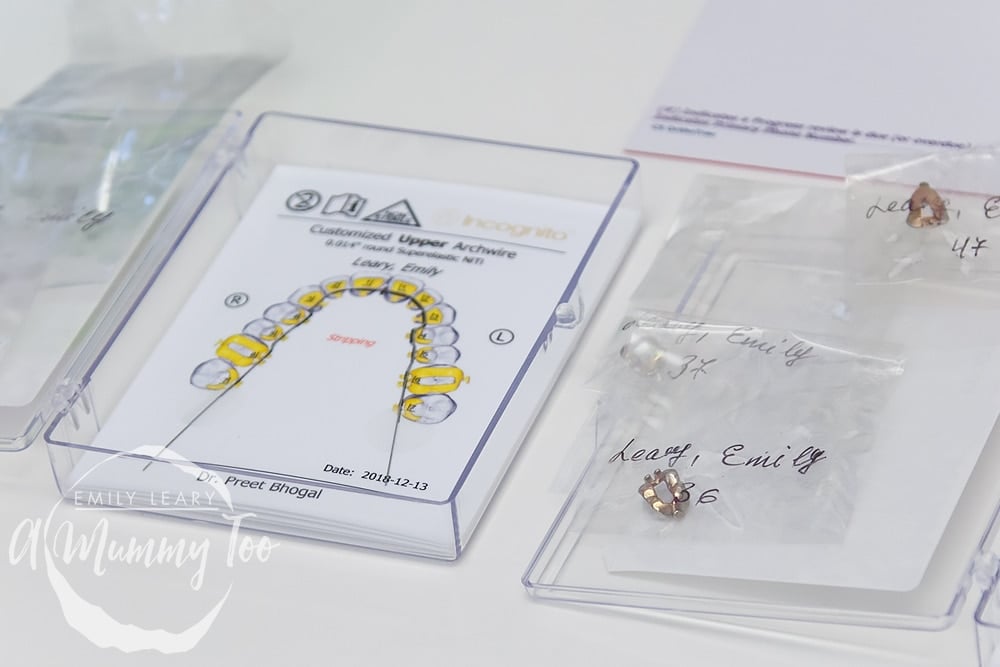
I signed the consent forms and all that was left to do was wait for the custom-made arches to arrive back from the lab, then we could get me booked in and have them fitted.
Having my lingual braces fitted
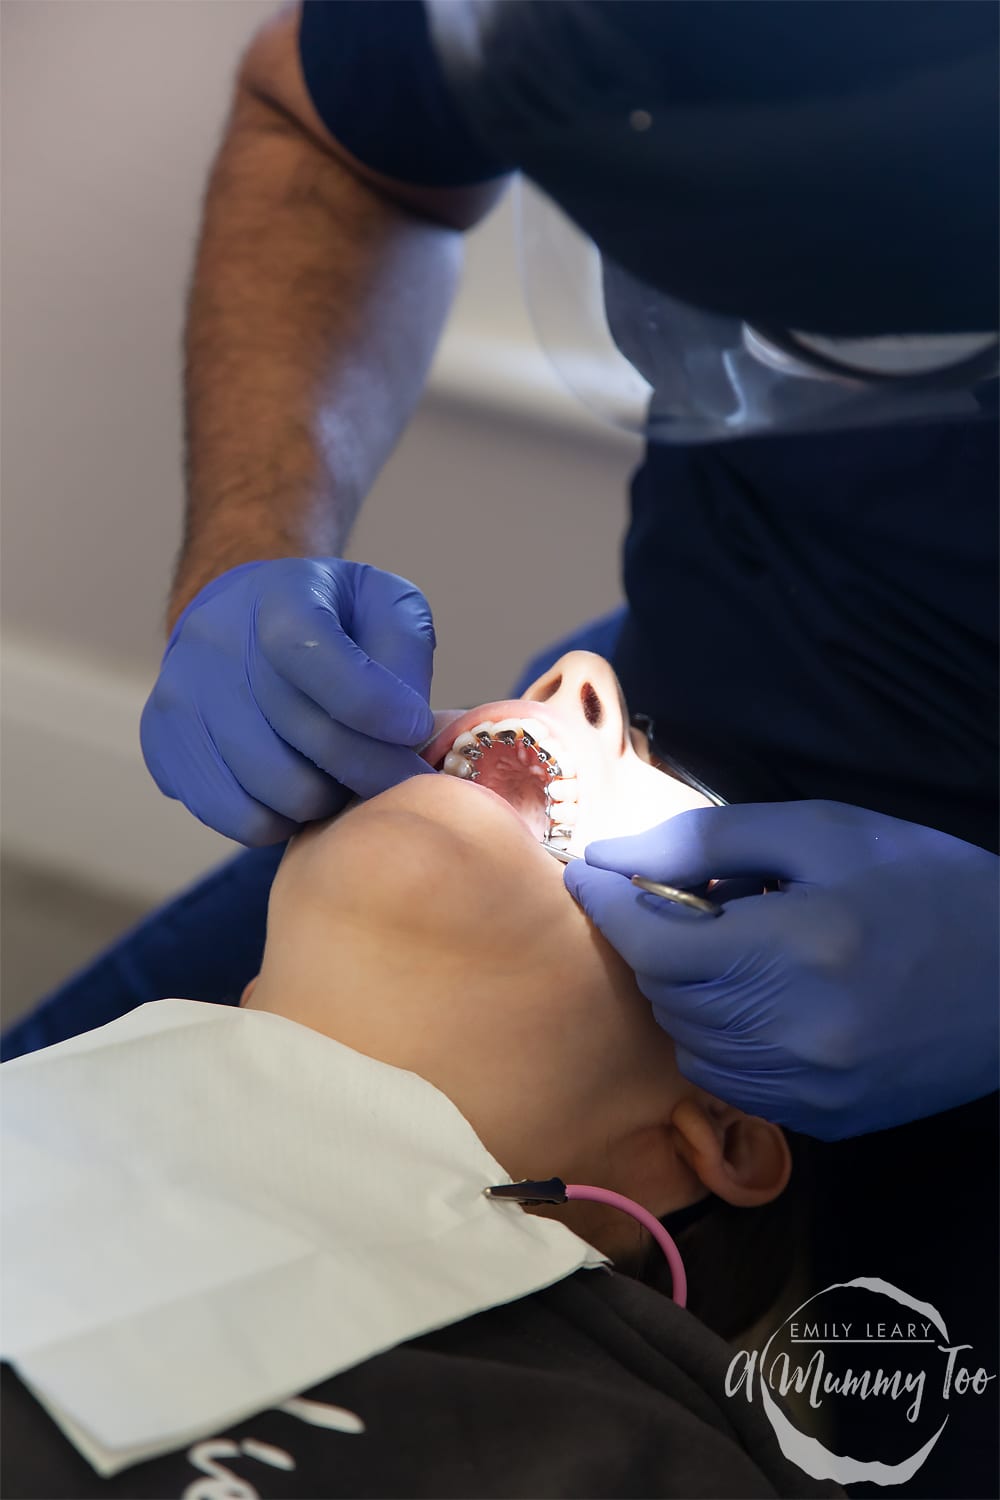
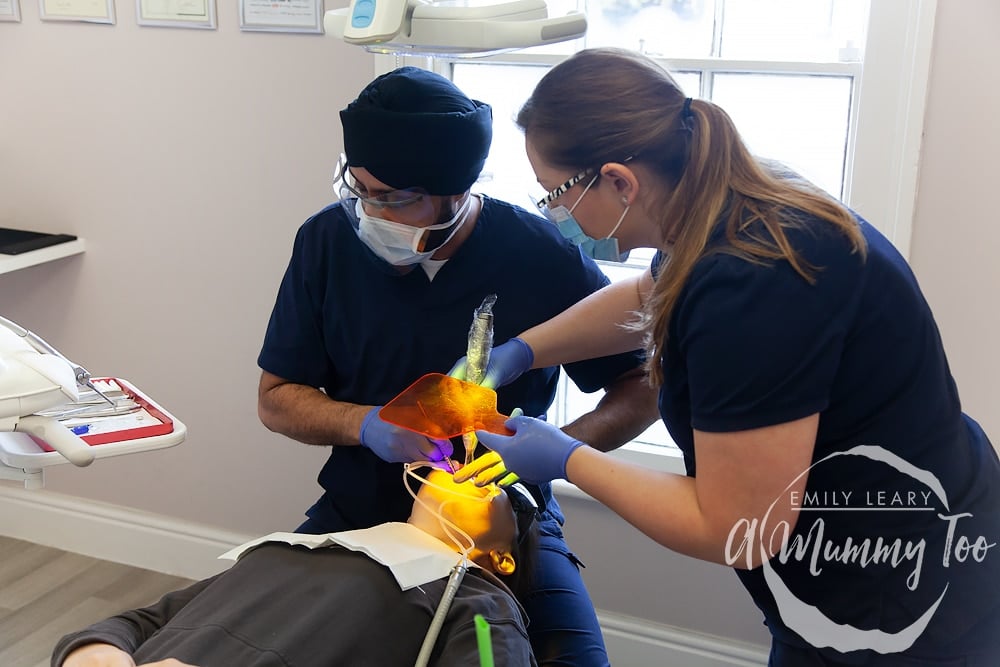
About 2 weeks later, the day of the fitting came. I was extremely nervous the night before and on the drive there, but my nerves soon settled once I was in the chair.
Dr Bhogal talked me through the whole procedure so that I knew what was coming. I was particularly relieved to learn that the actual fitting would take less than an hour.
I'd been advised by a couple of friends with braces to take painkillers just before going in, but I forgot and as it turns out, I didn't need them.
Fitting the guards
To begin the procedure, I was given safety glasses. These protect your eyes from any bits of debris from the procedure and also filter out some of the overhead light.
Next lip retractors were fitted, which held my mouth open and kept my lips out of the way. This wasn't painful or even uncomfortable, and I had remembered to moisturise my lips well that morning, which I'd recommend so that they don't crack.
Suction is fitted to either side of the lip retractors and, along with the manually applied suction, they suck up almost all of the liquids used during the procedure, so I never felt I had too much liquid in my throat as can happen during dental procedures.
Next, a tongue guard was fitted. This was the least pleasant part as it is quite a large, hard piece of plastic which fits over your tongue and holds it back, making it difficult to swallow. I also found that it pressed against the bony bit below my lower gums on one side, which rubbed and was a bit sore afterwards but only for a few hours.
Cleaning the teeth
The inner surfaces of the teeth obviously have to be super clean before they apply the braces, so Dr Bhogal rinsed them, then used a fine powder to blast the tooth surfaces.
I was given a cloth to wear over my face for this part as the powder goes everywhere, but it doesn't take long, isn't painful, and soon it was over and all the powder had been rinsed away.
Applying etch
An acidic substance called etch was then applied to the surface of every tooth. It's helps the glue to adhere better and makes it less likely that the brackets will loosen or come off during the course of the treatment.
They only used the tiniest bit per tooth but a bit of it ran down the back of my throat and truly tasted like bile. Yeeeeuck! Luckily each time it was used it was all over within seconds.
Applying glue
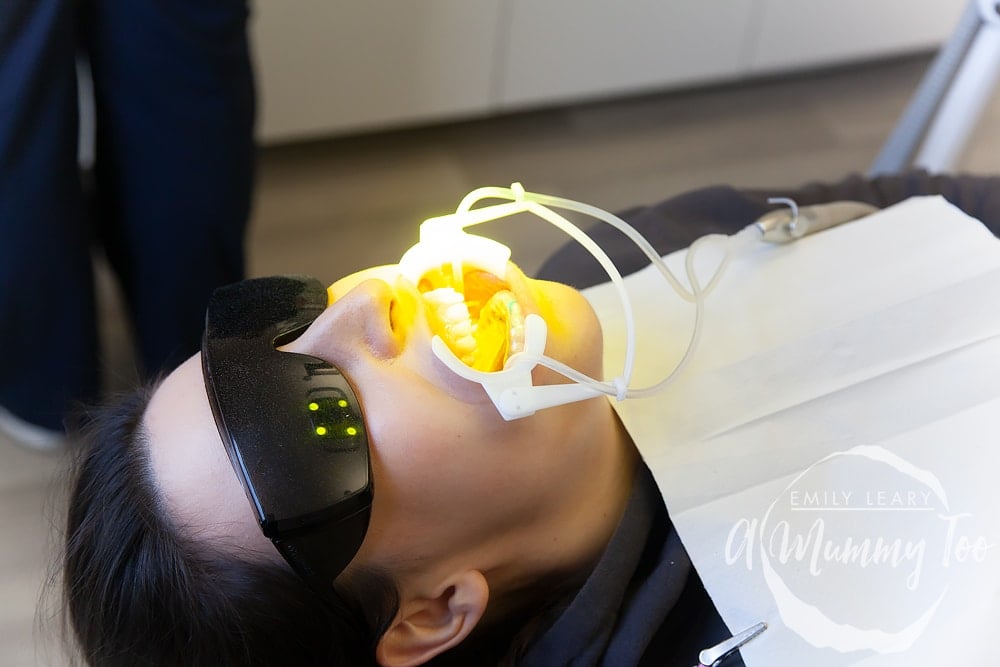
Once the etch had done its thing and been rinsed away, Dr Bhogal applied a small amount of the glue to each tooth. I couldn't really feel it going on but my tongue was desperate to escape
After the glue was applied, they then cured it a little with a special blue light.
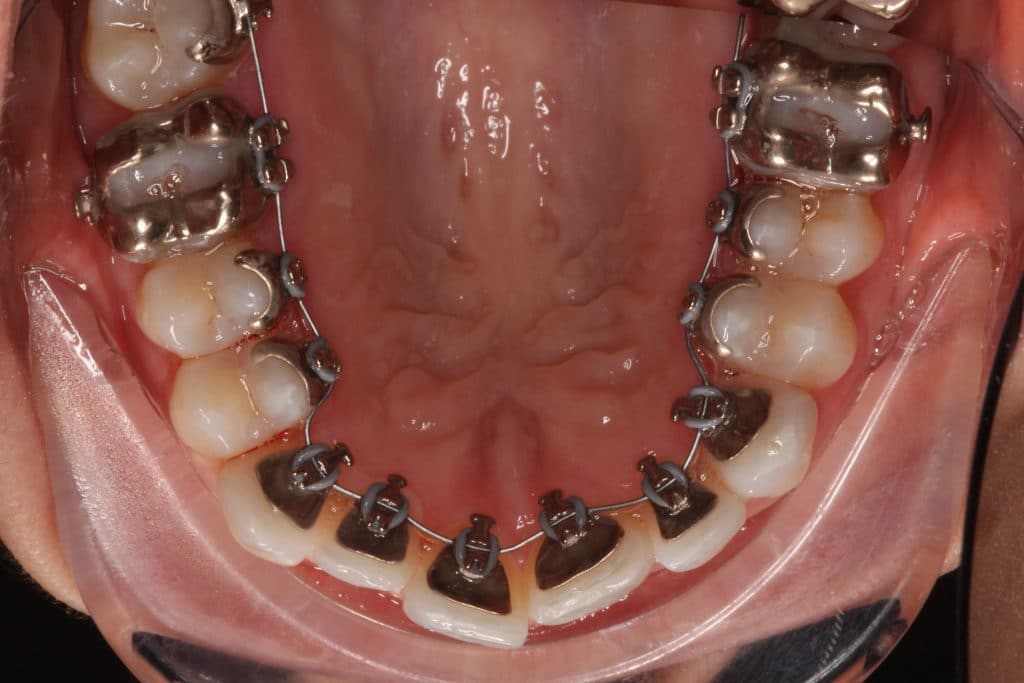
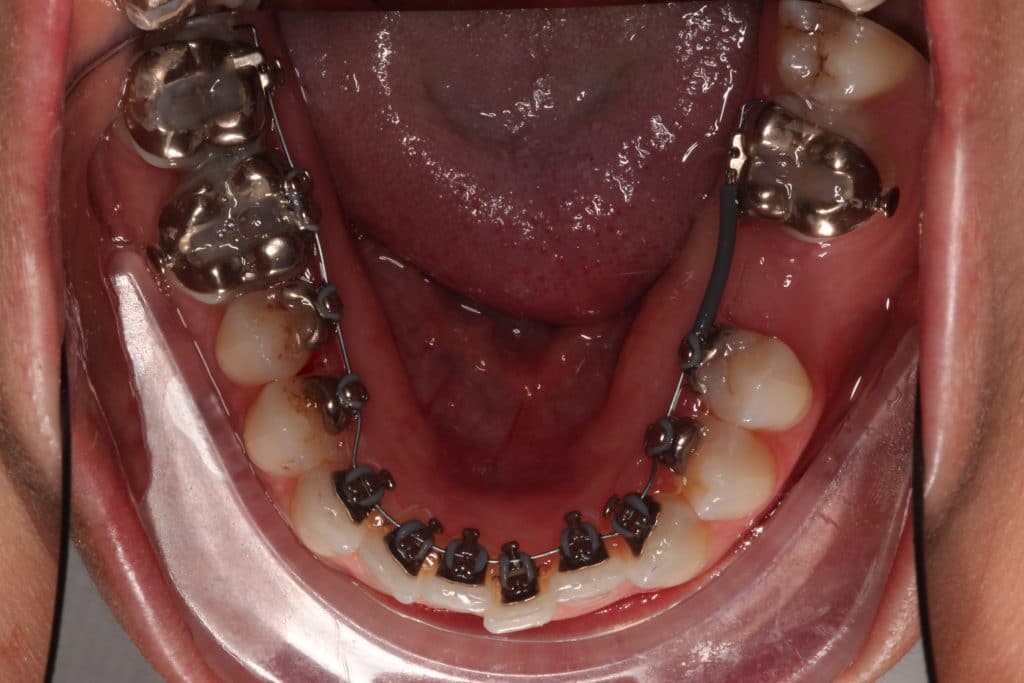
Fitting the main set of brackets
The brackets are the little pieces of metal that attach to each tooth. The hold the wire in place, which in turn slowly applies pressure to move the teeth into alignment.
With lingual braces, the brackets come fitted into two plastic trays, custom-designed to exactly fit the top and bottom arch.

This is super clever because not only does it make for perfectly positioned brackets, it also makes the process incredibly quick.
Working on one arch at a time, Dr Bhogal pressed the tray into place and applied firm pressure - this wasn’t painful. With the tray in place, each bracket met the glue on its corresponding tooth in exactly the right position.
After further light curing, the tray was lifted off.
Fitting the additional molar brackets
Once the main top and bottom brackets were in place, a small number of further brackets were fitted manually using the same etch, glue, cure, apply, cure process.
This included some at the back of each corner of my mouth fitting right some back molars, covering the front surface, biting surface and cheek surface of the tooth.
4 of these molar covering brackets (one in each quadrant) have a little protruding bump facing my cheek. These aren't used for anything

As they’re right at the back, they only show as a slight golden glint if I smile extra broadly.
Fitting the wire
With all of the brackets in place, the lip retractors and tongue guard were taken away and a custom-made wire was then applied to each arch. Dr Bhogal worked around the teeth, fixing the wire into each bracket. This was the first time I felt pressure between my teeth, but it was extremely mild and in no way painful.
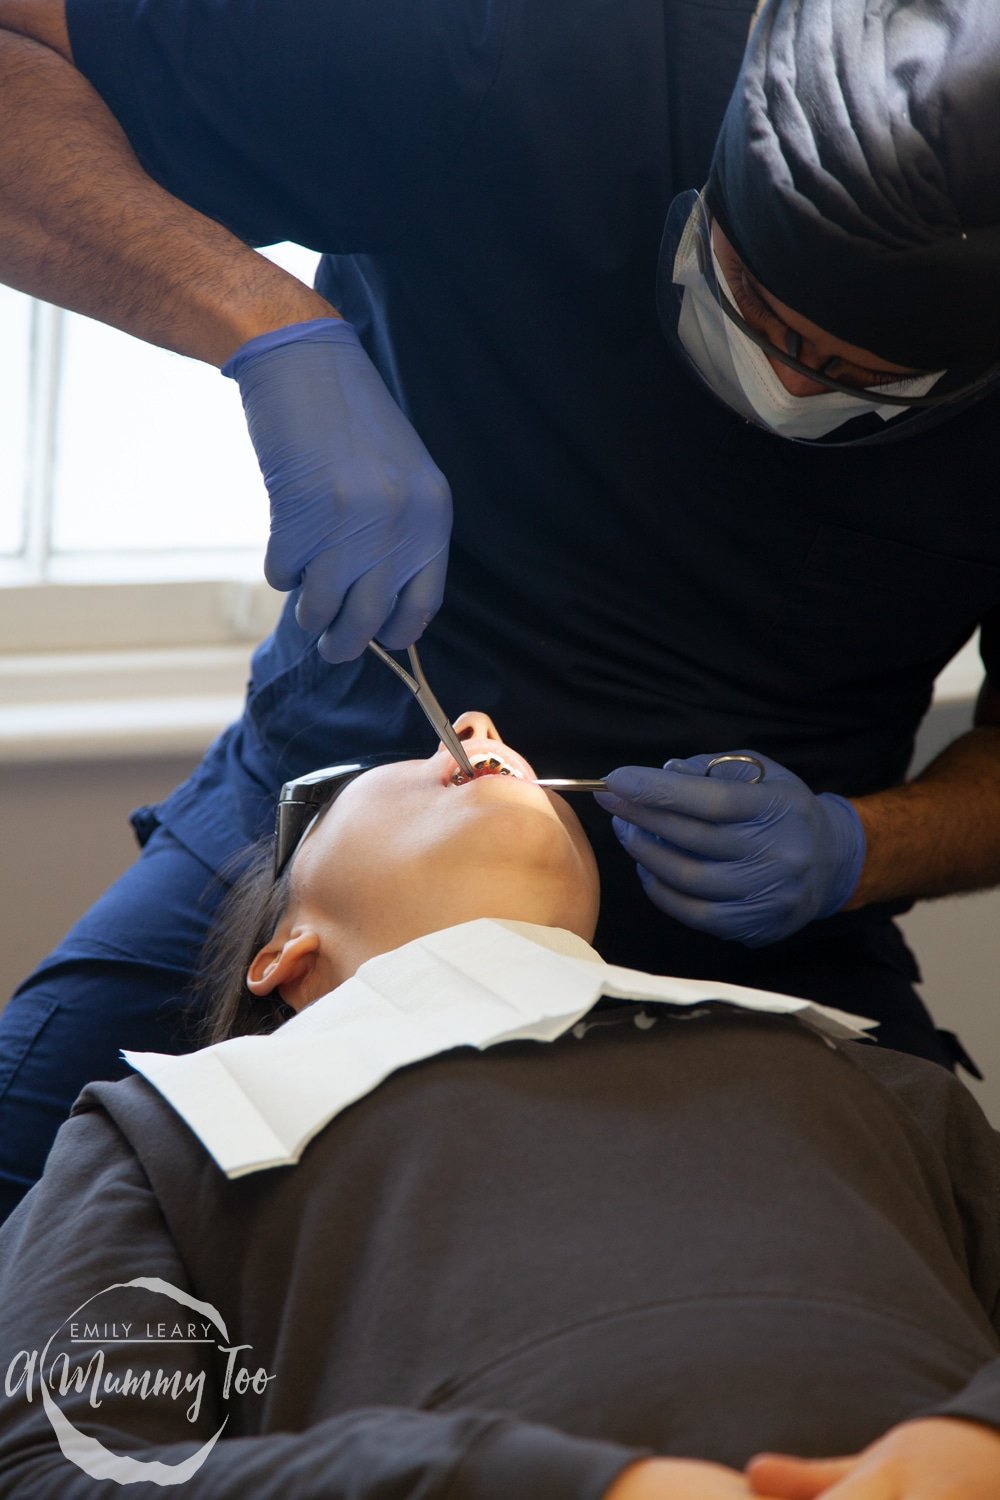
Where I have a missing molar on my right lower jaw, Dr Bhogal put a little rubber covering on the wire stretching between the two teeth either side so that I wouldn’t cut my tongue on it.
Finally, Dr Bhogal trimmed off the excess wire and folded the ends inwards just in front of my wisdom teeth (which do not have brackets) so that they would not irritate my tongue.
Tongue meets braces
At last, I was able to rinse before running my tongue around my mouth for the first time with the braces in place. It was a weird feeling, but not as sharp or as invasive as I was expecting and that came as a huge relief.
I learned that custom-building the brackets for my bite in the way they do allows the braces as a whole have the lowest possible profile. This means they feel really quite small and discomfort on the tongue and interference with speech is minimised as much as possible.
Dr Bhogal encouraged me to feel around with my tongue to make sure there were no sticking out wires or sharp surfaces. There were none, although I could feel the glue on the surfaces of my teeth close to the brackets and obviously, the brackets themselves would take some getting used to.
Next, I had my first try at speaking, which was a lot less lispy than I expected, and although I knew I'd still have work to do, I was over the moon.
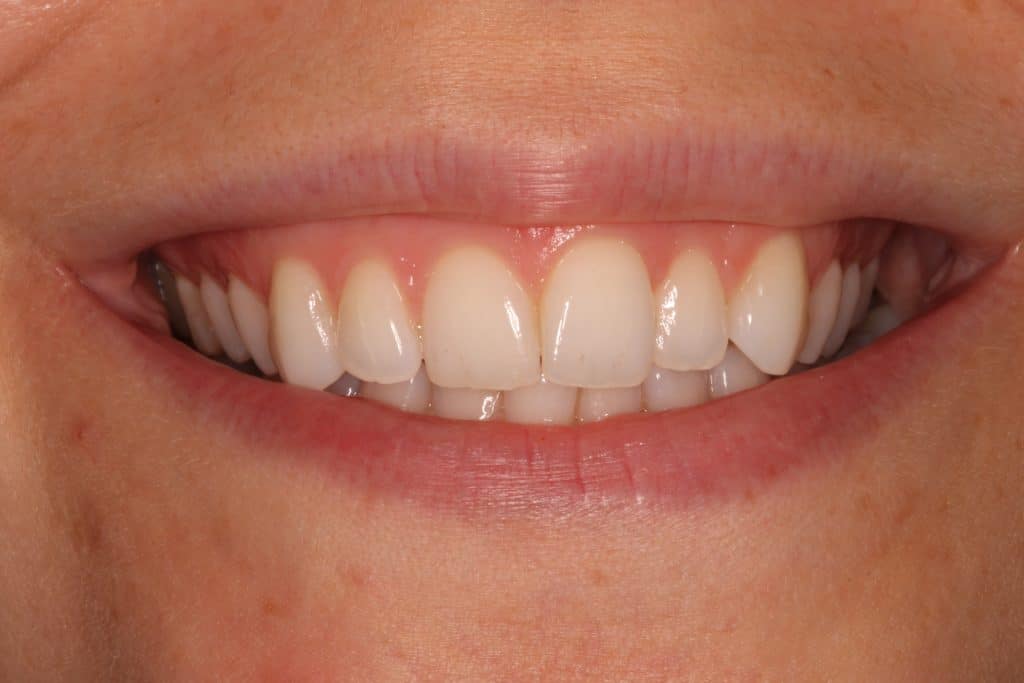
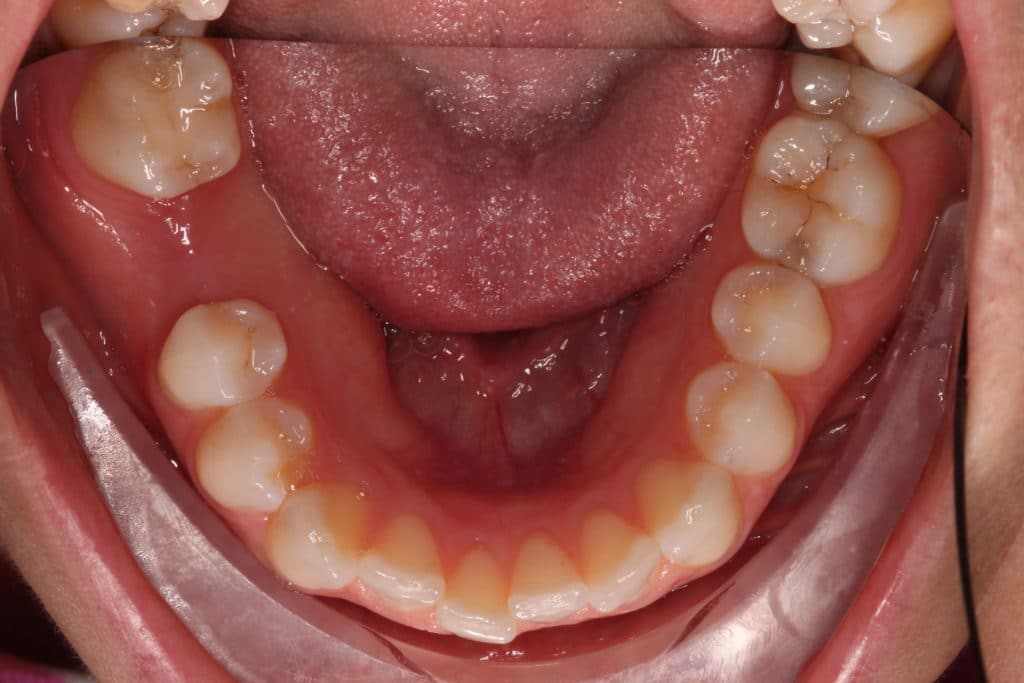
A first look
Dr Bhogal took a few photos of my teeth, exactly like he had done during that first assessment appointment, and then he put them up on
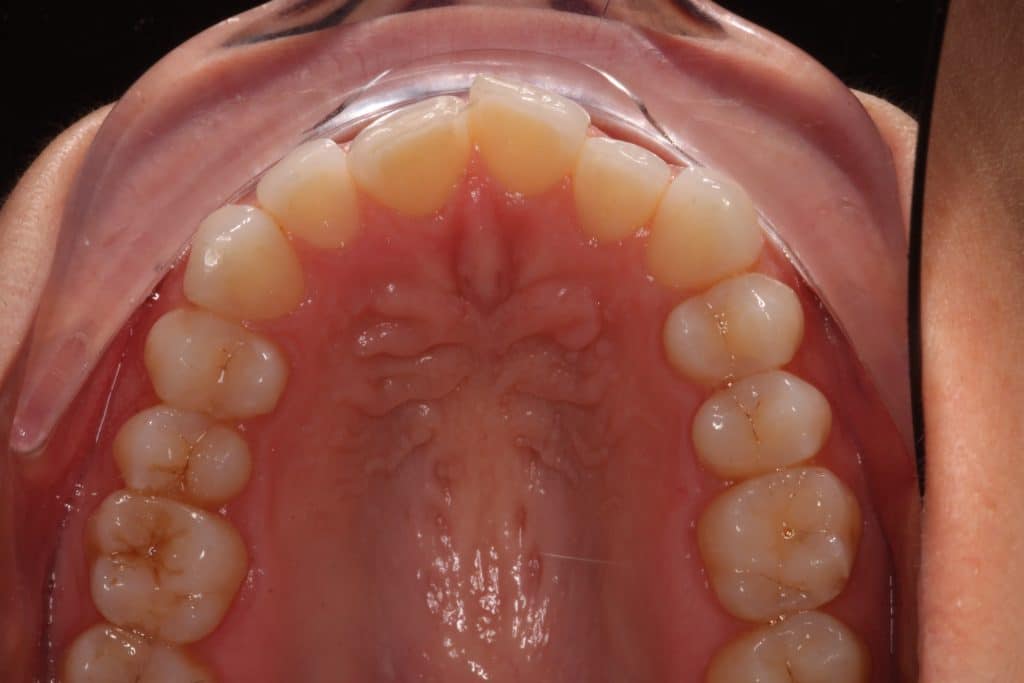
It was really clear that the wire was wiggling like spaghetti to get around the crowded teeth, and how closely bunched together the lower front teeth were.
Before I headed off, Dominika took me through for a reminder about the foods it was important to avoid such as nuts, very hard foods, chewing gum, fizzy drinks and sugary foods.
She also told me how to clean my teeth and braces and gave me a starter kit to help me along, which contained interdental brushes, an orthodontic toothbrush with a divot to allow for the brackets, and orthodontic toothpaste and mouthwash by Vitis, which is a mild apple and mint flavour, so it’s less irritating if you have any sore areas in the mouth.
I absolutely do not want to break my braces, and most definitely don't want to damage my teeth or have them rot, so I knew I would be treating her advice as gospel.
If you like, you can watch the whole fitting process in the video below. It's pretty detailed, but there's nothing gory, and you get to see my attempt to speak and even eat straight afterwards.
Well, I think that's enough for one post!
Hit the subscribe button to make sure you get a ping in your inbox when I post part two, sharing how I've got on during my first two months with lingual braces!
Signature Orthodontics are providing my orthodontic treatment in return for honest posts about my experiences.
Leave a Reply